
要看清一套基础设施,一个好的图表总是很有帮助。但手工绘制很花时间:要找合适的图标、摆放元素、画连线……我现在感兴趣的是能否用IA 自动化完成这些工作。
在这篇文章里,我展示了如何使用带有 Draw.io MCP 的 IA 代理来自动生成 AWS 架构图。我在示例中使用 Claude Code,但此方法适用于任何兼容 MCP 的代理。
起点:更新一个旧图
我之前有一篇关于本博客基础设施的文章,发表在 2018 年,里面的图是用 Draw.io 手工绘制的。基础设施本身没大变化——我主要添加了 OAC(Origin Access Control)和一个 CloudFront Function——但AWS 图标已经更新了,我想用最新版图标刷新图表。
在寻找自动化方案时,我发现了Draw.io MCP 服务器 及其 Chrome 扩展。我试了一下……觉得太酷了,于是决定写这篇文章分享。
MCP Draw.io:用 IA 控制 Draw.io
由 Ladislav (lgazo) 创建的 Draw.io MCP 服务器 是一个 MCP(Model Context Protocol)服务器,允许以编程方式控制 Draw.io。换句话说,一个 IA 代理可以在 Draw.io 画布中创建、修改并组织元素。
可用工具
| Catégorie | Outils | Usage |
|---|---|---|
| Inspection | get-selected-cell, list-paged-model | Lire l’état du canvas |
| Création | add-rectangle, add-edge, add-cell-of-shape | Ajouter des éléments |
| Modification | edit-cell, edit-edge, set-cell-data | Modifier des éléments existants |
| Bibliothèque | get-shape-categories, get-shapes-in-category | Explorer les shapes disponibles |
所需配置
为了让 IA 代理能与 Draw.io 通信,需要配置两个要素,如项目文档 中所述:
- 一个本地 MCP 服务器 —— 在代理的 settings 文件中配置(例如 Claude Code 使用的
.mcp.json) - Draw.io MCP Chrome 扩展 —— 它在 MCP 服务器和浏览器中的 Draw.io 应用之间建立桥接
这两项配置就绪后,代理可以直接操作 Draw.io 画布:创建 shapes、定位、画连线,以程序化方式完成所有操作。
在测试 MCP Draw.io 时,我发现需要对代理进行引导才能得到干净的结果:不要臆造资源、使用正确的 AWS 图标、保持一致的位置关系、按类别上色、避免在文本中使用 HTML……因此我为 Claude Code 编写了一个skill 来编码这些规则。
创建 skill /aws-diagram
一个 Claude Code 的 skill 是一个定义了工作流和规则的 Markdown 文件。当调用 /aws-diagram 时,Claude Code 会加载这些指令并自动执行。
工作流
这个 skill 遵循四步流程:
- 读取基础设施代码(Terraform、CloudFormation)
- 提取 AWS 资源 及其关系
- 用官方 AWS 图标构建图表
- 添加带描述标签的连线
📄 Extrait du skill : Workflow
## Workflow
1. **Read infrastructure code** (Terraform, CloudFormation, etc.)2. **Extract AWS resources** and their relationships3. **Build diagram** with official AWS icons4. **Add connections** with descriptive labels
关键规则
我在 skill 中编码了若干重要规则:
1. 绝不臆造资源
这是最大的陷阱。LLM 往往会“补全”看起来合理的东西。比如“有 CloudFront,就应该有 Lambda@Edge……”——不!图表必须精确反映代码中存在的内容,不能多加任何东西。
📄 Extrait du skill : Ne jamais inventer
### NEVER invent resources
**Only diagram what actually exists in the infrastructure code.**
| Situation                  | Wrong                                         | Correct                                      || -------------------------- | --------------------------------------------- | -------------------------------------------- || No Lambda in Terraform     | Add Lambda@Edge because "it would make sense" | Don't add Lambda                             || CloudFront Function exists | Use Lambda icon                               | Use CloudFront icon with "CF Function" label || No WAF configured          | Add WAF for "security"                        | Don't add WAF                                |
2. Users 属于外部
“Users” 不是 AWS 资源。它们必须出现在 AWS 云分组之外。
📄 Extrait du skill : Users externes
### Users OUTSIDE the AWS Cloud
**Users are NOT AWS resources.** They represent external actors.
WRONG:┌─────────────────────────────────┐│ AWS Cloud ││ [Users] → [Route53] → [CF] │ ❌ Users inside cloud└─────────────────────────────────┘
CORRECT:[Users] → ┌─────────────────────────┐│ AWS Cloud ││ [Route53] → [CF] → [S3] │ ✅ Users outside└─────────────────────────┘
3. 文本中不要使用 HTML
Draw.io 不渲染 HTML。如果你写了 text: "S3<br>Private",图表中会字面显示 <br>。
📄 Extrait du skill : Pas de HTML
### NEVER use HTML in text parameters
Draw.io does NOT render HTML tags in text fields. They display as raw text.
**FORBIDDEN (will show ugly raw HTML):**
text: "S3 Bucket<br>Private" ❌ Shows "<br>" literallytext: "Route 53 DNS" ❌ Shows " " literallytext: "<font color='red'>ACM</font>" ❌ Shows raw HTML tags
**CORRECT (clean text):**
text: "S3 Bucket" ✅ Single line, cleantext: "Route 53" ✅ Service name onlytext: "ACM" ✅ Simple label4. 规划布局以避免碰撞
交叉的边线会让图表不可读。skill 建议将主流程放在一条水平线上,辅助服务放在上方或下方。
📄 Extrait du skill : Layout et collisions
### Rule 1: Main Flow on a Horizontal Line
Place the primary data flow (request path) on a single horizontal row:
[Entry] → [Service A] → [Service B] → [Service C]y=300 y=300 y=300 y=300
### Rule 2: Auxiliary Services Above or Below
Services that connect TO a main service (not part of the flow) go above or below:
        [Auth]     [Edge Logic]     ← Auxiliary row (y=150)           \           /            \         /             ↓       ↓
[Entry] → [Gateway] → [Compute] → [Storage] ← Main flow (y=300)
5. 注释放在右侧,不要放在下方
AWS 图标的标签默认放在下方。如果你也在下方添加注释,会与下一行重叠。把注释放在图标的右侧。
📄 Extrait du skill : Placement annotations
### Annotation Placement Rules
**CRITICAL: Place annotations to the RIGHT of icons, not below.**
**WRONG - Annotations below icons:**
[CloudFront] [S3]|"Cache Policies" ← Overlaps with next row!"Security Headers"|[CloudFront Preview] ← Collision!
**CORRECT - Annotations to the RIGHT:**
[CloudFront] ── "Cache Policies: HTML 0s | Assets 1y"| "Security: CSP | HSTS"↓[CloudFront Preview] ← No collision
配色系统
我定义了一套与 AWS 约定一致的配色:
| Catégorie | Couleur | Services |
|---|---|---|
| Networking | #8C4FFF (紫色) | Route53, CloudFront, VPC |
| Storage | #7AA116 (绿色) | S3, EFS |
| Security | #DD344C (红色) | ACM, IAM, WAF |
| Compute | #ED7100 (橙色) | Lambda, EC2 |
对于数据流,我使用不同环境颜色:
- Production:绿色
#4CAF50 - Preview:橙色
#FF9800 - Configuration:灰色
#AAAAAA(虚线)
📄 Extrait du skill : Couleurs et styles
### Colors by Category
| Category       | Color               | Services                                   || -------------- | ------------------- | ------------------------------------------ || **Networking** | `#8C4FFF` (violet)  | Route53, CloudFront, VPC, ELB, API Gateway || **Compute**    | `#ED7100` (orange)  | Lambda, EC2, ECS, Fargate                  || **Storage**    | `#7AA116` (green)   | S3, EFS, EBS                               || **Database**   | `#C925D1` (magenta) | RDS, DynamoDB, ElastiCache                 || **Security**   | `#DD344C` (red)     | ACM, IAM, WAF, Cognito                     || **General**    | `#232F3D` (gray)    | Users, Generic                             |
### AWS Icon Style Template
sketch=0;outlineConnect=0;fontColor=#232F3E;fillColor=<COLOR>;strokeColor=#ffffff;dashed=0;verticalLabelPosition=bottom;verticalAlign=top;align=center;html=1;fontSize=12;fontStyle=0;aspect=fixed;shape=mxgraph.aws4.resourceIcon;resIcon=mxgraph.aws4.<SERVICE>;
### Edge Colors by Environment
| Environment   | Color     | Usage                  || ------------- | --------- | ---------------------- || Production    | `#4CAF50` | Main production flow   || Preview       | `#FF9800` | Staging environments   || Configuration | `#AAAAAA` | Dashed, non-data links |
具体应用:jls42.org 的基础设施
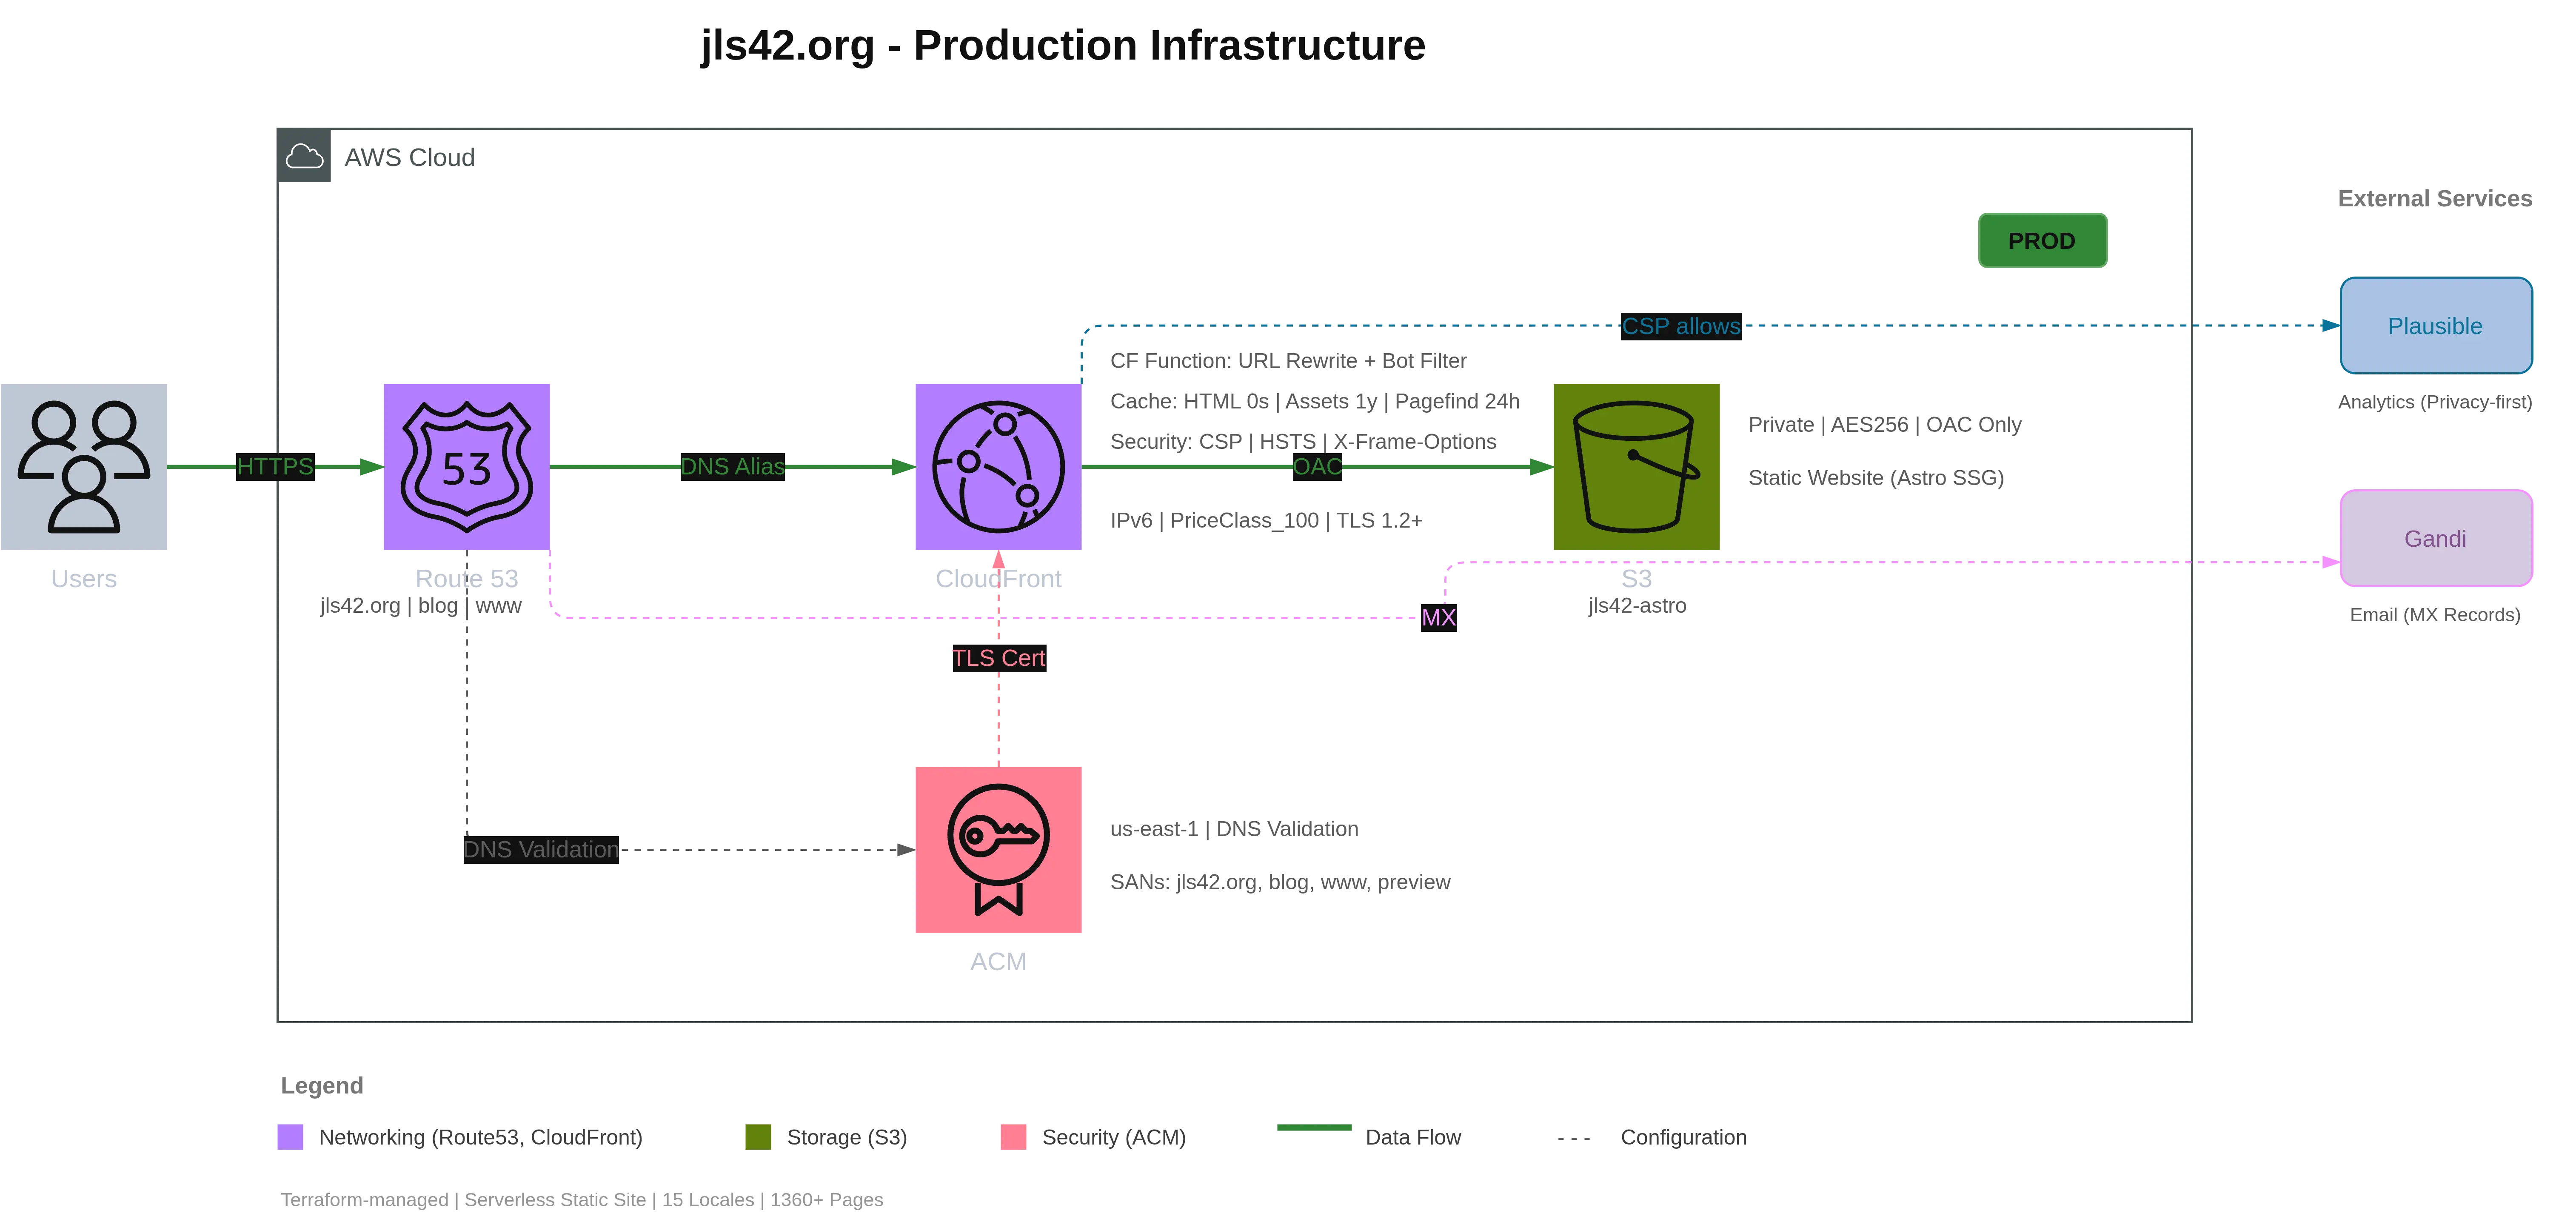
为了测试这个 skill,我在本博客的基础设施上使用了它。
被分析的 Terraform 代码
terraform/├── cloudfront-astro.tf # Distribution CloudFront prod├── s3-astro.tf # Bucket S3 privé avec OAC├── acm-astro.tf # Certificat SSL├── route53.tf # DNS└── variables.tf # Variables提取出的架构
| 组件 | AWS 服务 | 配置说明 |
|---|---|---|
| DNS | Route 53 | jls42.org 区域,3 个域名 |
| CDN | CloudFront | OAC、CloudFront Function、缓存策略 |
| 存储 | S3 | 私有 Bucket、AES256、仅 OAC 可访问 |
| TLS | ACM | us-east-1 的证书,DNS 验证 |
生成的图表
这是最终结果:
只用一个自然语言的提示:
«Analyse en profondeur l’infrastructure de ce projet puis réalise un super schéma de l’architecture AWS comme un pro. Juste l’infra de prod, pas preview ni legacy.»
🇨🇳 深入分析这个项目的基础设施,然后像专业人士一样制作一个超级AWS架构图。只要生产环境,不要preview也不要legacy。
Claude Code 首先分析了 Terraform 文件以识别基础设施,然后加载了 skill /aws-diagram,其指令完成了:
- 创建主要组件(Users、Route53、CloudFront、S3、ACM)
- 添加详细注释(缓存策略、安全头、Bucket 配置……)
- 用带标签的连线表示连接(HTTPS、DNS Alias、OAC、TLS 证书……)
- 添加外部服务(Plausible Analytics、Gandi 用于邮件)
- 按类别生成图例
整个过程遵循了一个清晰的布局:
- AWS 云自动设定尺寸(900×420px)
- Users 位于云的左侧
- 外部服务位于右侧
- 图例放在图下方
完整工作流:从 Terraform 到视频
我进一步把体验做成了演示视频。
录制
我录制了图表实时生成的过程:4 分 10 秒,Claude Code 读取 Terraform、逐个创建元素,并在我眼前构建图表。
用 FFmpeg 进行后期处理
4 分钟对演示来说太长。我用 FFmpeg 做了变速处理,按段调整速度:
| Segment | Contenu | Vitesse |
|---|---|---|
| 0:00-0:10 | Demande à Claude de générer le diagramme | 1x |
| 0:10-0:32 | Analyse du code Terraform | 15x |
| 0:32-0:35 | Skill /aws-diagram détecté et lancé automatiquement | 1x |
| 0:35-3:46 | Génération du diagramme dans le navigateur | 15x |
| 3:46-3:56 | Repositionnement des labels pour meilleur visuel | 1x |
结果:将 4 分 10 秒缩成了42 秒的视频,同时保留关键片段的正常速度。
用 HeyGen 配音
为了添加旁白,我写了旁白脚本,将视频切成 30 秒一段(HeyGen 的限制),用法语生成语音。默认语音不太合我意,我使用了他们的语音设计功能,通过调整提示来生成合适的语调。
最终的视频就是文章顶部可以观看的那个。
第二个示例:高可用 EKS 架构
为了说明 MCP Draw.io 的强大,这里给出第二个更复杂的示例:高可用的 EKS(Elastic Kubernetes Service)架构。MCP 在 Draw.io 中完成了所有创建工作——我只需提供一个详细的提示。
这次我提供了一个描述期望架构的详细提示:
📋 Prompt complet pour l'architecture EKS
Architecture EKS Hautement Disponible
Génère un diagramme d'architecture AWS EKS avec les composants suivants :
## Services AWS à inclure
### Externes (gauche du cloud)
- Users (icône utilisateurs générique)
### Networking
- Route 53 (DNS)- Application Load Balancer (ALB) - dans les subnets publics- NAT Gateway (3x, un par AZ)- VPC avec 3 AZ
### Compute (subnets privés)
- EKS Control Plane (géré par AWS - représenter séparément)- 3 Node Groups (un par AZ) avec pods à l'intérieur
### Storage
- EFS (stockage partagé cross-AZ)
### Security
- ACM (Certificate Manager)- IAM (pour Pod Identity / IRSA)
### Observability
- CloudWatch (logs et métriques)
## Connexions à tracer
| Source            | Target      | Label               | Style       || ----------------- | ----------- | ------------------- | ----------- || Users             | Route 53    | HTTPS               | Solid green || Route 53          | ALB         | DNS Alias           | Solid green || ALB               | Node Groups | Traffic             | Solid green || ACM               | ALB         | TLS                 | Dashed gray || Node Groups       | EFS         | NFS Mount           | Solid green || EKS Control Plane | Node Groups | kubectl API         | Solid green || EKS Control Plane | IAM         | IRSA / Pod Identity | Dashed gray || Node Groups       | CloudWatch  | Logs / Metrics      | Dashed gray |
生成结果
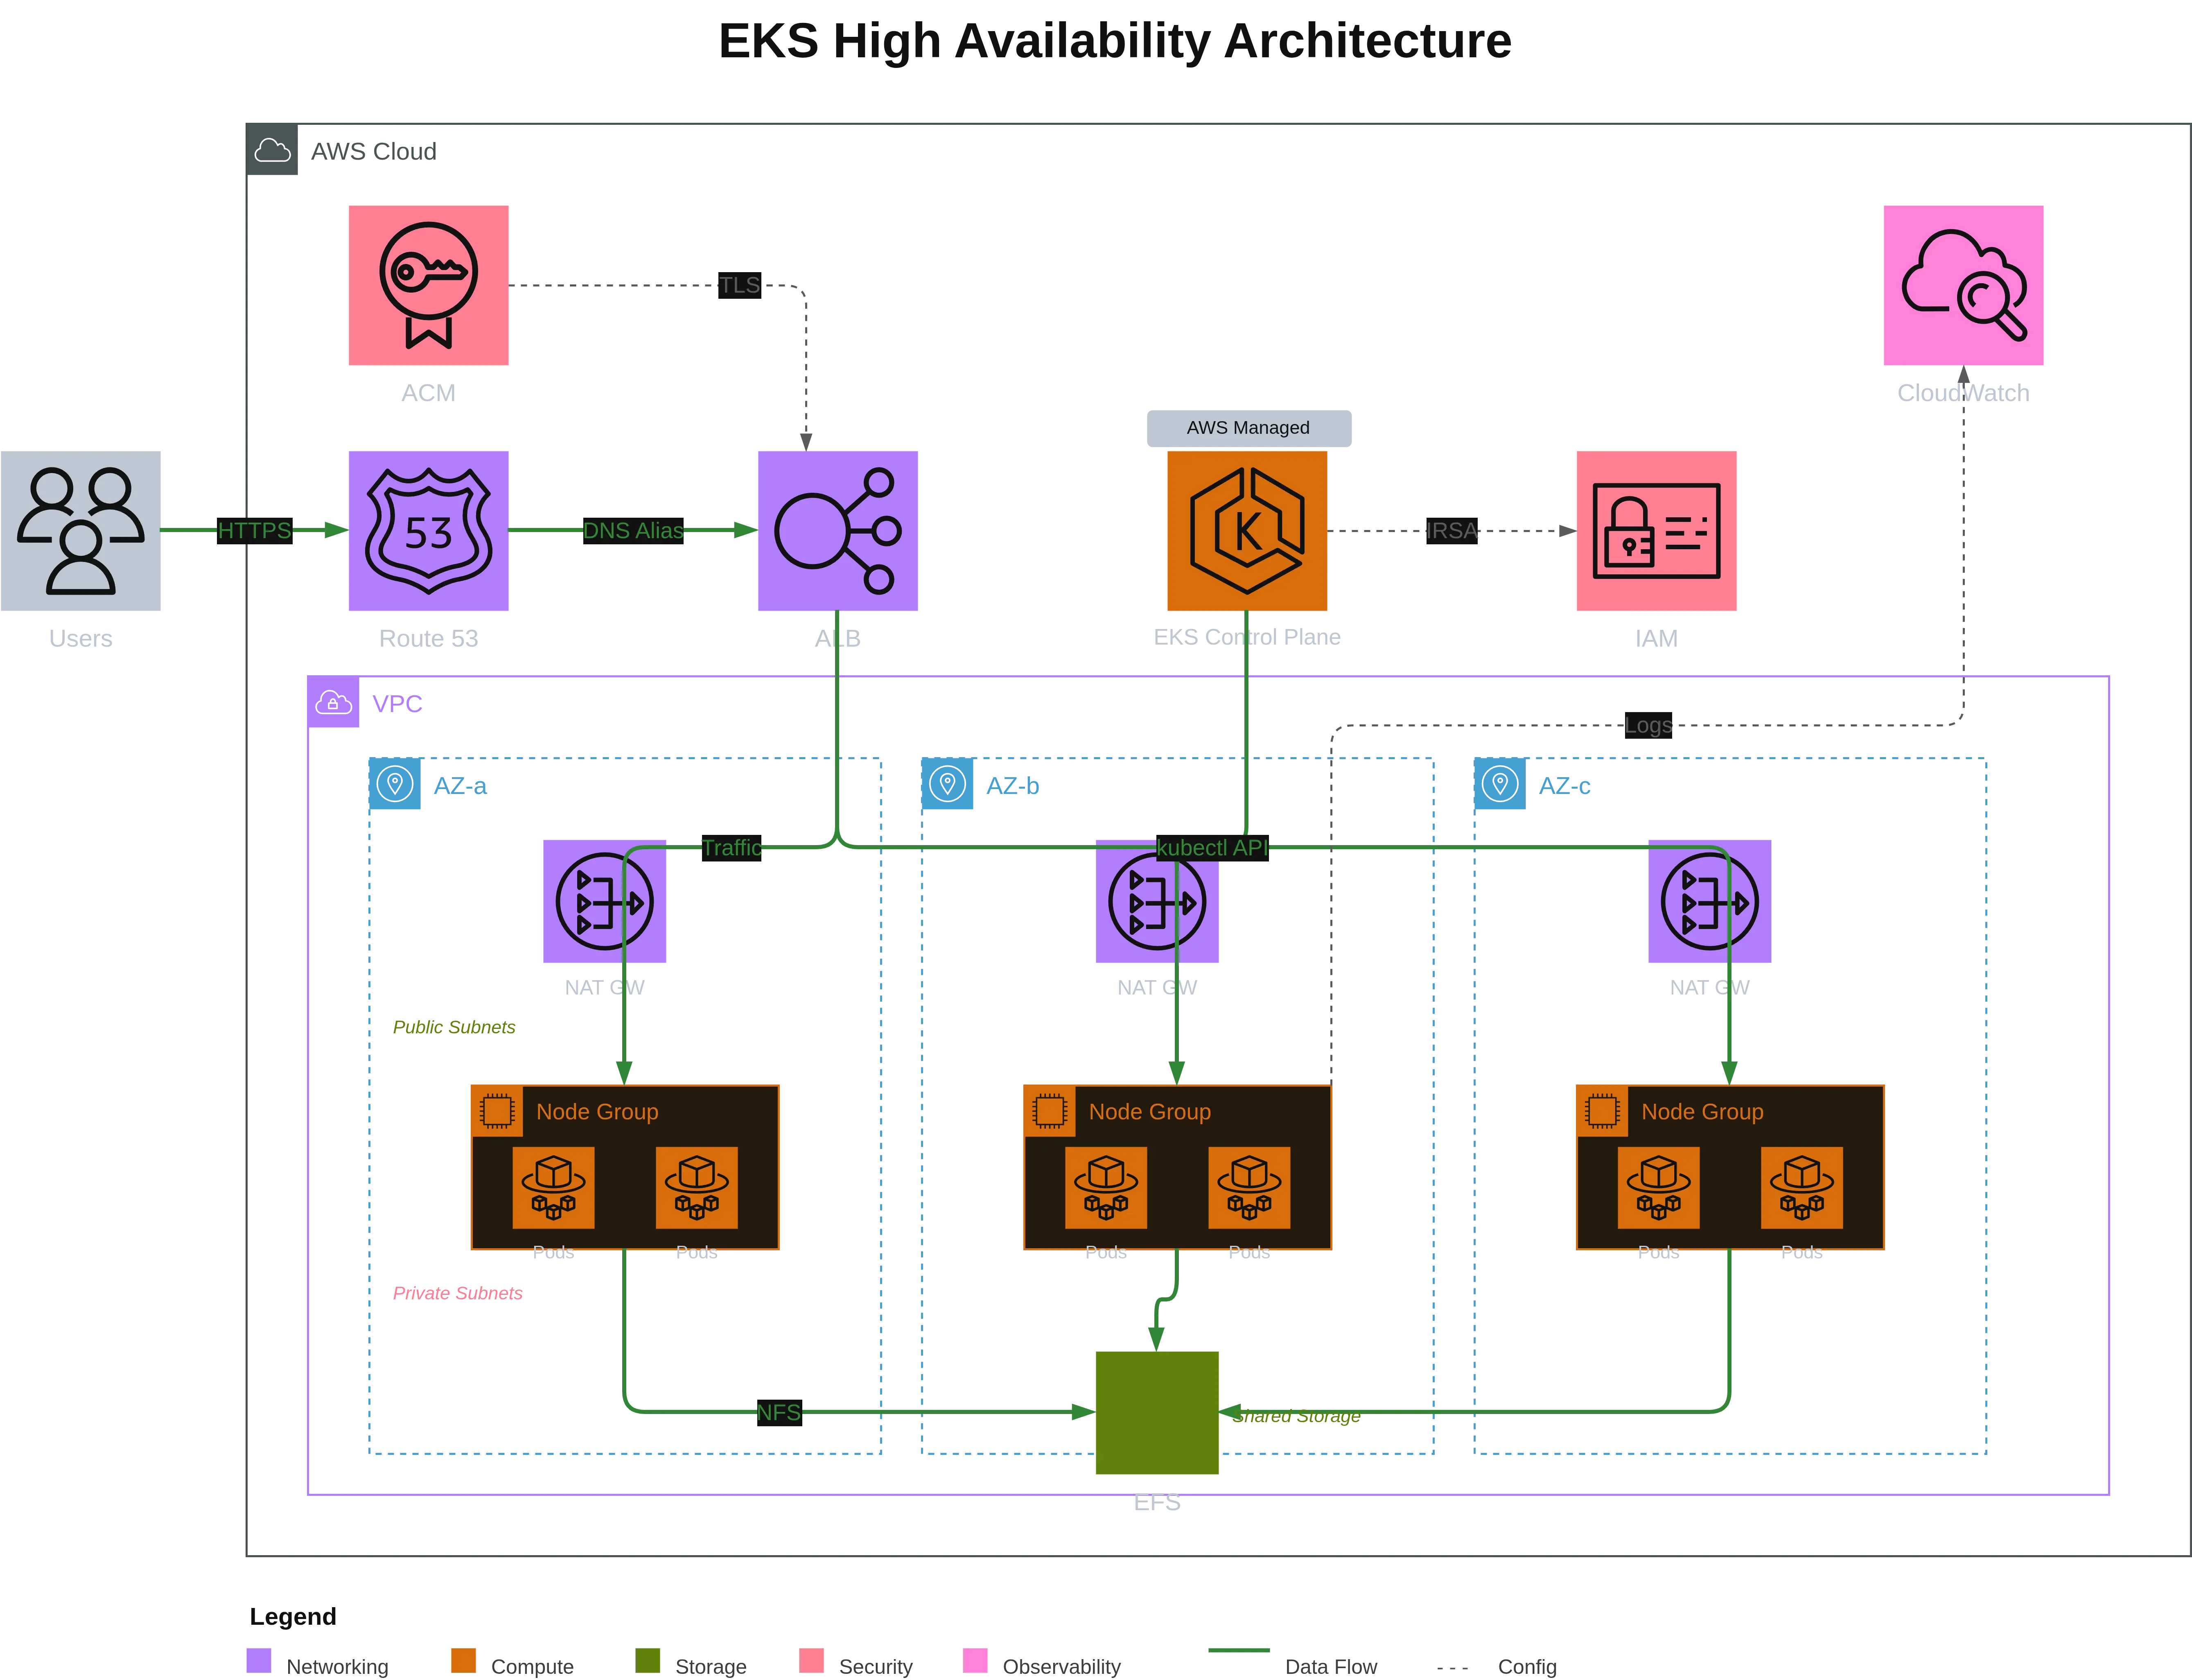
该图展示了一个面向生产的 Kubernetes 架构,包括:
- 3 个可用区以实现高可用
- 冗余 NAT Gateway(每个 AZ 各一个)用于出网
- 节点组分布,每个 AZ 中均有 node group 和 pod
- 跨 AZ 的 EFS 用于持久共享存储
- 由 AWS 托管的 Control Plane 在视觉上独立展示
- IRSA(IAM Roles for Service Accounts) 用于 pod 的安全
MCP Draw.io 正确理解并创建了 VPC 与 AZ 分组,将 NAT Gateway 放在公有子网,将 Node Groups 放在私有子网。结果提供了一个非常好的起点,便于根据视觉偏好微调或修正可能的错误——比从零开始快得多。
这个项目揭示的内容
这次实验反映了我工作方式的几个方面:
- 自动化文档:代码是事实来源,图表应由代码自动生成
- 使用合适的工具:MCP Draw.io 正是我需要的工具,我没有重复造轮子
- 将规则编码化:skills 捕捉专长并避免常见错误——适用于任何类型的 Draw.io 图表,而不仅限于 AWS
- 在真实场景中测试:我用自己的基础设施做了试验场
- 推动探索:从自动生成到带旁白的视频,每一步都是学习的机会
这个 skill 现在已整合到我的工作流。下次修改基础设施时,我只需一个提示就能重新生成图表。
资源
- Draw.io MCP 服务器 由 Ladislav (lgazo) 提供
- MCP - 模型上下文协议 由 Anthropic 提供
- Claude Code — 我日常使用的 CLI 工具
如果你使用兼容 MCP 的编码代理并且需要为基础设施做文档,我鼓励你尝试这种方法。看着一个干净的图表在眼前自动生成,感觉非常满足。
感谢阅读,希望这篇文章能激发你去尝试!
本文件已使用 gpt-5-mini 模型将 fr 版本翻译为 zh 语言。有关翻译过程的更多信息,请参阅 https://gitlab.com/jls42/ai-powered-markdown-translator